

close
Choose Your Site
Global
Social Media
Views: 143 Author: Site Editor Publish Time: 2026-08-18 Origin: Site


Compromised flexible metal conduit (FMC) often acts as a hidden liability in industrial settings. It quietly risks ingress protection, electrical safety, and overall facility downtime. You might easily overlook a tiny jacket tear during routine maintenance inspections. Over time, however, these tiny breaches create massive vulnerabilities.
Liquidtight Flexible Metal Conduit (LFMC) handles harsh environments exceptionally well. Manufacturers design it to withstand moisture, oils, and physical impacts. However, mechanical stress, constant chemical exposure, and improper installation inevitably compromise the PVC jacket. Once breached, the inner metal core faces rapid degradation. Water and contaminants bypass the primary defense layer.
This guide offers facility managers and electrical contractors a highly practical, code-aware framework. We will help you carefully evaluate, correctly repair, or fully replace damaged flexible conduit coating. You will discover exactly how to maintain strict NEC compliance while preventing catastrophic moisture ingress. Following these guidelines ensures long-term operational safety and system reliability.
Not all PVC coating damage is repairable; structural metal exposure often triggers mandatory replacement under NEC/UL guidelines.
The most frequent defects—cracking, peeling, and tearing—usually stem from improper bend radii, chemical incompatibility, or UV degradation.
Approved repair methods rely on specific PVC touch-up compounds and shrink sleeves, not standard electrical tape.
Addressing coating defects proactively prevents catastrophic moisture ingress, corrosion, and grounding failures.
You might think a small scratch on a conduit jacket matters very little. Unfortunately, a minor tear escalates quickly into massive system failures. Moisture creeps in through these microscopic openings. It travels along the inner wire path. Eventually, this moisture reaches sensitive control panels or motor termination boxes. What begins as a superficial blemish transforms into a severe electrical hazard.
Compromised coatings immediately void critical IP66, IP67, and NEMA 4/4X ratings. These ratings guarantee protection against environmental hazards. When the jacket tears, the conduit loses its liquidtight designation. Water, lubricating oils, and conductive dust penetrate the inner core freely. Your equipment instantly becomes vulnerable to short circuits. You lose the environmental seal protecting your vital infrastructure.
Safety and compliance risks escalate rapidly in these scenarios. Inspectors routinely flag damaged jackets as severe National Electrical Code (NEC) violations. The internal metal core often serves as an equipment grounding conductor. If moisture corrodes this core, you face dangerous grounding issues. In wet industrial environments, compromised grounding pathways significantly increase the risk of lethal arc flashes. You simply cannot ignore these safety realities.
We must also consider the immediate cost implications of inaction. Early intervention remains incredibly inexpensive. Repairing a minor jacket abrasion requires minimal materials and labor. Conversely, unscheduled downtime costs facilities thousands of dollars per hour. Waiting until the system fails requires complete rewiring, new conduit pulling, and extended operational halts. Prompt repairs save budgets and preserve production schedules.
Technicians must accurately identify coating defects before attempting any repairs. Visual inspections often reveal four primary failure modes. Understanding these specific defects helps you address the root causes directly.
Symptoms: The jacket becomes hardened and entirely inflexible. You will notice hairline fractures or deep fissures spreading across the surface. When you bend the conduit, the plastic snaps rather than stretching.
Root Causes: Prolonged UV exposure typically causes embrittlement, especially when installers use non-UV-stabilized materials outdoors. Extreme temperature cycling also degrades the plasticizers inside the PVC. Furthermore, exceeding the rated operating temperature bakes the jacket until it loses all elasticity.
Symptoms: The outer PVC layer separates completely from the inner metallic core. It pulls away, creating loose pockets or sleeves of unsupported plastic. You might see the bare metal spirals exposed beneath the peeling flaps.
Root Causes: Chemical incompatibility stands as the leading cause of delamination. Standard PVC reacts poorly to specific synthetic cutting fluids, harsh washdown chemicals, or industrial solvents. Manufacturing defects during the extrusion process can also prevent proper bonding between the metal and the plastic.
Symptoms: You will find localized gashes, deep scrapes, or worn patches on the exterior. These defects often expose the internal galvanized metal directly to the elements. They look like physical wounds on the conduit body.
Root Causes: Heavy mechanical impact accounts for most punctures. Forklifts dropping pallets or dropped tools easily pierce standard jackets. Friction from heavy machine vibration rubs the conduit against sharp structural edges. Aggressive pulling or improper routing during the initial installation also drags the jacket over abrasive surfaces.
Symptoms: The protective coating physically pulls away from the end fittings. This movement exposes the bare metal core precisely at the termination point. It looks as though the jacket is too short for the conduit run.
Root Causes: Installers frequently select improper, non-compatible fittings. Over-torquing the connector crushes the plastic and forces it backward. Severe thermal contraction in freezing environments also forces the jacket to shrink away from its designated termination seal.
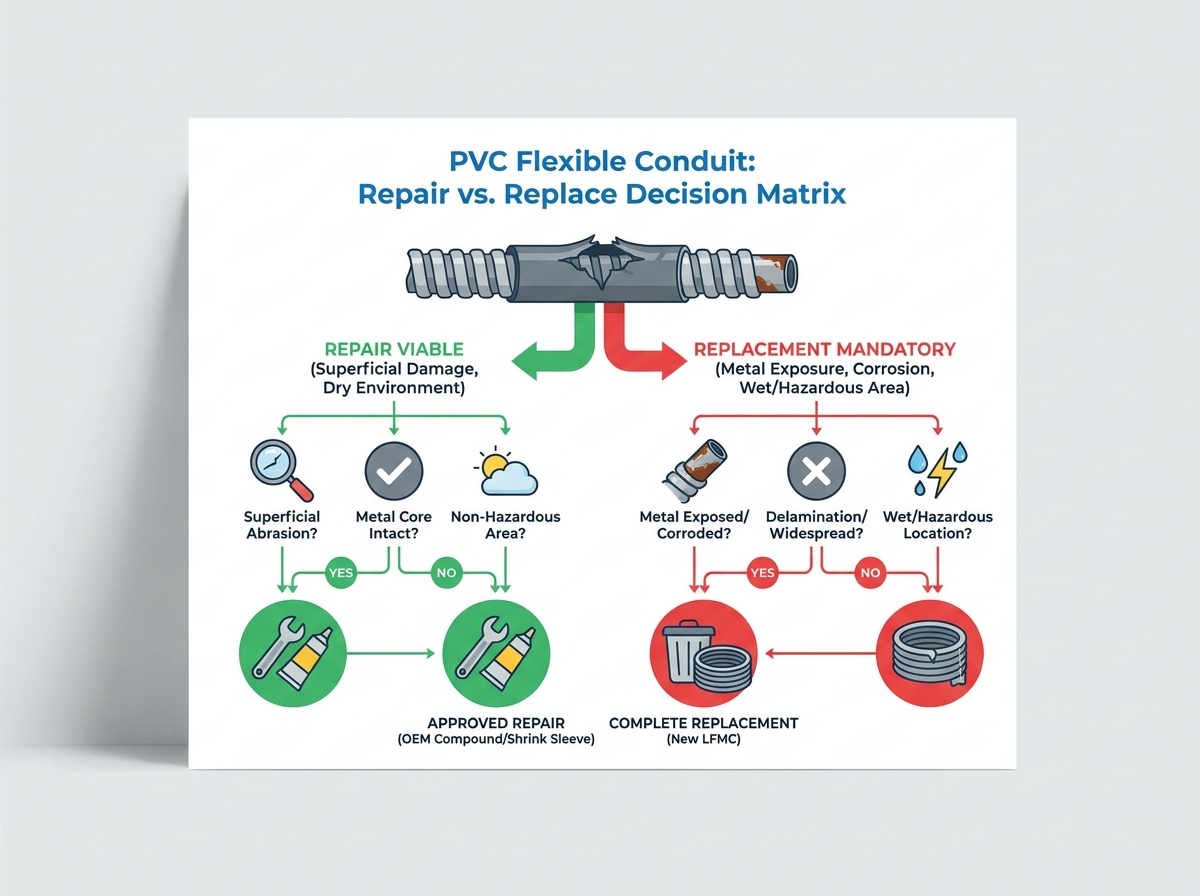
Facility technicians face a constant dilemma when discovering damaged conduit. They must decide whether a quick patch suffices or if full replacement is mandatory. We recommend using a clear, skeptical-friendly framework to evaluate jacket damage safely. Misjudging the severity leads to dangerous code violations.
To simplify this critical decision, consult the evaluation matrix below. It separates acceptable repair scenarios from mandatory replacement triggers.
Evaluation Criteria | Repair Viable (Green Light) | Replacement Mandatory (Red Light) |
|---|---|---|
Depth of Damage | Superficial abrasions. Damage does not penetrate the full thickness of the PVC. | Deep gashes exposing metal. Delamination spans a significant length of the conduit run. |
Internal Metal Core Condition | Small punctures where the underlying metal shows zero signs of rust or physical deformation. | The internal metal armor is bent, visibly crushed, separated, or heavily rusted. |
Moisture Ingress | Dry interior. No evidence of liquids migrating inside the jacket. | Moisture has already wicked inside. Internal wire insulation may be severely compromised. |
Environmental Classification | Systems operating purely in non-hazardous, unclassified, and entirely dry environments. | Highly regulated areas (food processing, hazardous locations). Patched conduit violates strict compliance. |
You must approach every inspection with caution. If you spot rust on the inner coils, you must replace the section. Rust indicates prolonged water exposure. It destroys the conduit's ability to act as a safe grounding path. Similarly, structural crushing compromises the internal wire insulation. No surface patch fixes internal structural failure.
Keep your operational environment in mind. Food and beverage facilities require strict sanitary standards. Patching compounds create uneven surfaces where bacteria breed. Hazardous locations containing flammable gases require flawless factory seals. In these demanding sectors, a simple repair creates unacceptable liability.
We must emphasize a harsh implementation reality first. Standard vinyl electrical tape provides a temporary, non-compliant fix for LFMC. It fails to restore factory integrity. Tape adhesives break down rapidly under industrial oils or heat. You must use approved repair methods to maintain environmental ratings safely.
When you determine a defect is eligible for repair, follow these precise protocols.
Step 1: Isolation and Assessment. Always de-energize the circuit before touching the conduit. Implement strict lockout/tagout procedures. Once safe, clean the damaged area thoroughly. Use an approved non-corrosive solvent, like isopropyl alcohol, to remove stubborn oils, grease, and dirt. A clean surface guarantees proper adhesion for the repair material.
Step 2: Selecting the Repair Material. Discard the electrical tape. We recommend industry-approved, permanent solutions. Choose OEM-grade liquid PVC touch-up compounds for localized punctures. For larger circumference repairs, select heavy-wall, adhesive-lined heat shrink tubing. The adhesive lining is non-negotiable for creating a watertight seal.
Step 3: Application Process. The method depends entirely on your chosen material.
For liquid compounds: Apply the compound in thin, overlapping layers. Use a brush to feather the edges into the healthy jacket. Allow proper curing time between each coat. Building up thin layers restores uniform thickness and prevents ugly, brittle globs.
For heat shrink tubing: This method only works if a free end of the conduit is accessible. Slide the sleeve directly over the defect. Apply controlled heat using an industrial heat gun. Start from the center and move outward. The heat shrinks the tubing while melting the internal mastic adhesive, firmly sealing the breach.
Step 4: Post-Repair Testing. Never assume a repair worked without verifying it. Inspect the metal core for electrical continuity if applicable. Ensure your repair overlaps the healthy, undamaged coating by at least one to two inches on all sides. Finally, gently flex the repaired section. You must verify the conduit maintains its required flexibility without cracking the new patch.
Watch out for improper curing times. Liquid patches often dry to the touch quickly but remain vulnerable underneath. Check the manufacturer guidelines. Most compounds require a full 24 hours to achieve maximum chemical resistance. Rushing the equipment back into service washes away the uncured patch.
Reacting to damage costs time and resources. Proactive planning eliminates most jacket failures before they ever occur. You must evaluate your installation environment accurately during the initial design phase.
Specify the right materials early in the project. Standard PVC handles general applications perfectly. However, it fails quickly in extreme conditions. Guide your procurement team to upgrade to specialized coatings. Polyurethane jackets offer superior resistance to heavy industrial abrasion. Thermoplastic Rubber (TPR) excels in high-flex robotic applications and extreme temperature swings. Choosing the correct chemical formulation upfront prevents premature delamination.
You must also strictly respect minimum bend radii. Exceeding the manufacturer’s minimum bend radius causes massive premature stress. Sharp bends stretch the outer curve of the plastic until it micro-tears. Simultaneously, the inner curve bunches up and separates from the metal. Train your installation crews to use wider sweeps. Avoid bending conduit tight against sharp machinery corners.
Proper fitting integration remains equally crucial. Jacket pull-back almost always results from improper terminations. Highlight the absolute necessity of using listed, fully compatible liquidtight connectors. Ideally, source fittings featuring insulated throats and dedicated sealing rings. These components grip the outer jacket firmly. They prevent thermal contraction from pulling the plastic away from the seal. If you want to discuss your specific flexible conduit coating requirements, consulting an expert ensures you select compatible hardware.
Flexible conduit coating integrity remains entirely non-negotiable for system safety and equipment longevity. A compromised jacket opens the door to moisture, internal corrosion, and dangerous electrical faults. You cannot afford to ignore minor surface damage during facility inspections.
Apply sensible shortlisting logic when evaluating damage. Minor superficial abrasions safely accept patches using OEM-approved compounds. However, structural degradation, rusted armor, or widespread delamination demands immediate and complete conduit replacement. Do not risk safety for a cheap fix.
Take immediate action to protect your infrastructure. We encourage you to audit your current conduit installations this week. Look for hidden tears near high-vibration machinery. Consult a certified electrical engineer for strict compliance verification. Alternatively, request a quote for upgraded, application-specific LFMC to bulletproof your most vulnerable equipment runs.
A: No. Electrical tape does not provide a permanent, watertight seal and will not restore the conduit's IP or NEMA rating, making it a compliance violation in wet/industrial environments.
A: Depending on ambient temperature and humidity, touch-up compounds typically dry to the touch in 2-4 hours, but require 24 hours for a full, chemically resistant cure.
A: Jacket pull-back usually occurs due to extreme temperature fluctuations or the use of incompatible fittings that fail to securely grip the outer PVC layer during mechanical stress.


